Create Realistic Clouds in 3ds Max with FumeFX
Hello everyone, I'm here with another exciting tutorial. This time we are going to learn how to make clouds. This is very interesting, but still a very hard topic.
There are many ways to create clouds. Many Software packages provide their own cloud generating modules, such as Vue, Maya, Houdini, etc... but we need plugins if we are using 3ds Max. There are two or three plugins for 3ds Max that you can use to make clouds. For example, Fumefx, Afterburn or DreamScape.
As you all know, there are two types of plugins, fluid based and texture based. FumeFX is a fluid based plugin and Afterburn is texture based plugin. In this tutorial we are going to learn how we can create clouds with the help of FumeFX, which again is a fluid based plugin.
So get ready for this exciting tutorial…!!!
Editors Note: If you'd prefer to follow along using high resolution Images. You can download them below:
1.Create the Geometry to Generate Clouds
To generate clouds, geometry plays a very important role, because ourcloud shape is totally depended on our geometry's shape & its internalmotion. So to create a proper shape for the geometry, follow these steps:
Step 1
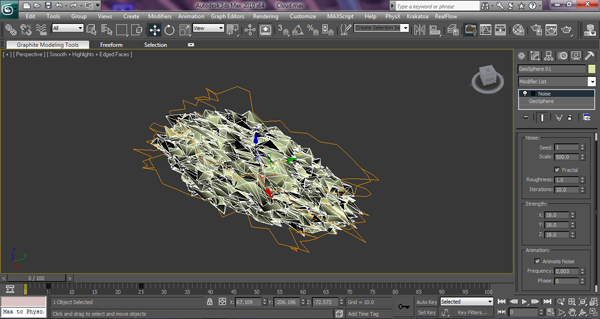
To generate the clouds, we are going to use a Geosphere with a Noise modifier (which we will animate for a certain amount of frames.)
To Create a Geosphere, go to the Create Panel > Geometry > StandardPrimitives > Geosphere.
Click on the Geosphere button and generate it in the viewport by clicking and dragging.
Step 2
Position and scale the Geosphere as follows:
Position:
X : 0.0 | Y : 0.0 | Z : 0.0
Rotation:
X : 0.0 | Y : 0.0 | Z : 0.0
Scale:
X : 150.0 | Y : 50.0 | Z : 50.0
Step 3
Now it’s time to modify the Geosphere's parameters. Select Geosphere 01 and go to the Modify Panel. Set the Radius to 150.0 and the Segments to 20.
Step 4
Now let’s add a Noise modifier. To add a Noise modifier, select the Geosphere and click on the Modifiers drop-down menu and choose the Noise modifier. Now make the following changes to it's parameters.
Noise:
Seed: 1
Scale: 500
Fractal: Checked
Roughness:1.0
Iterations: 10.0
Strength:
X: 18
Y: 18
Z: 18
Animation:
Animate Noise – Checked
Frequency – 0.003
Phase – Animated*
* We are going to animate the Phase value fromframe 5 to frame 25. As soon as you turn on the Animate Noise option, you willsee keys appear at frame 0 and 100. Now what you have to do is just select thefirst key, which is on frame 0 and move it forward on the timeline to frame 5. Now select the secondkey, which is on frame 100 and move it to frame 25.
Nowyou can see the noise animation is only happening between frame 5 and 25.
2. Copy & Arrange theGeospheres
Step 1
I know what you are thinking. “What is this copy & arrange...?” Right..??
I'll tell you. What we are going to do is make multiple copies of our Geosphere and arrange them as per ourrequirements or our shot's requirements.
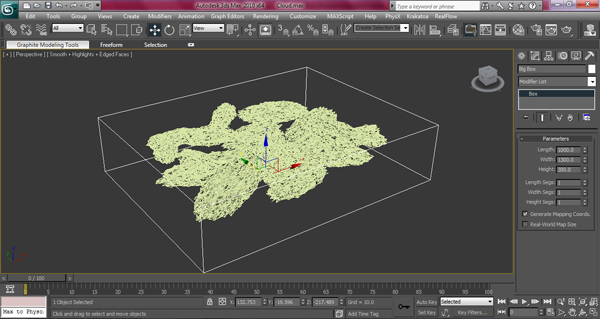
For example, I created a big box to arrange my scene. Iplaced each and every Geosphere inside the box with random positions and rotations. Not a single Geosphere crossed the boundary of this box. So what's the advantage of doing this? This technique will help you determine your scene size, whether it's bigor small, and you can create your Fumefx container to match the size of the box.
My Box size is as follows:
Length: 1000
Width: 1300
Height: 300
I’ve included the 3ds Max file of my scene setup in the project files. Please have a look.. :)
3. Create the FumeFX Object Source
Step 1
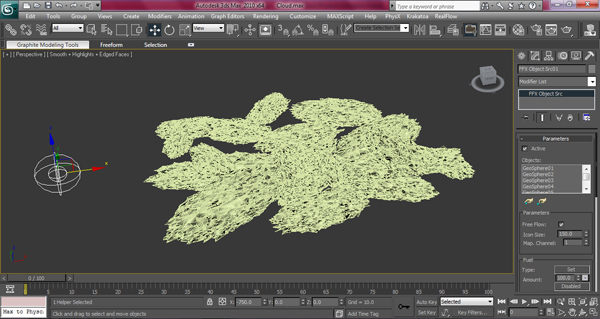
We are going to use a FumeFX Object Source to create our Clouds. ToCreate the FFX Object Source, follow these steps : Go to the Create Panel> Helpers, click on the Dropdown menu and select FumeFX from the list.
Clickon the Object Src Button and generate it in viewport by Left Clicking and dragging (you can place it anywhere in the scene.) Renamethe FFX Object Src01 to "FFX Cloud Src".
4. Create the FumeFX Container
Step 1
Now it’s time to create the FumeFX Container. To create the container followthese steps:
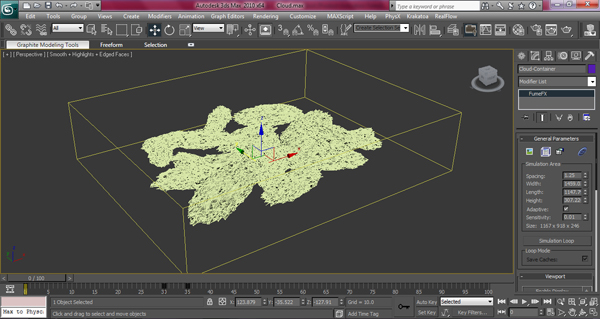
Go to the Create Panel > Geometry and clickon the Dropdown menu and select FumeFX from the list. Click on theFumeFX button and generate the FumeFX Container in the viewport by Left Clicking and dragging. Now rename it from FumeFX01 to "Cloud-Container".
Step 2
Position the Cloud Container at the following location:
X: 123.879
Y: -35.522
Z: -127.91
Place this container inthe same position as the "big box" we already created.
5. Edit the FumefX Container
There are Five importantsections in the FumefX Container we are going to modify:
A. Gen – General
B. Sim – Simulation
C. Rend – Rendering
D. Illum - Illumination
E. Obj/Src - Objects & Sources
Step 1
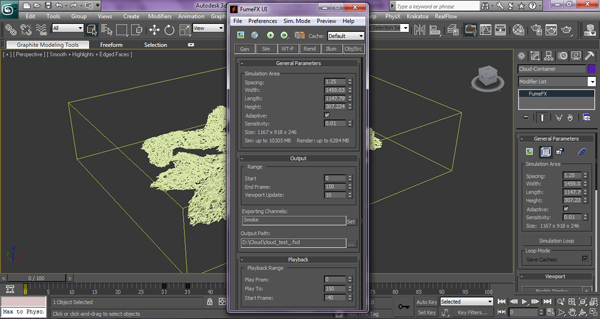
Open FumeFX, go to the Gen tab and set the following parameters for each section.
A. Gen Tab:
General Parameters:
Spacing: 1.25
Width: 1459.034
Length: 1147.799
Height: 307.224
Adaptive: On
Output:
Start: 0
End Frame: 150
Exporting Channels: Smoke.
Output Path: Click on the small button next to Output path, make a New Folder on yourStorage Drive and save your cache file (fxd) as "Cloud_test_" inthat Folder.
Playback:
Play From: 0
Play To: 150
Start Frame: -40
Step 2
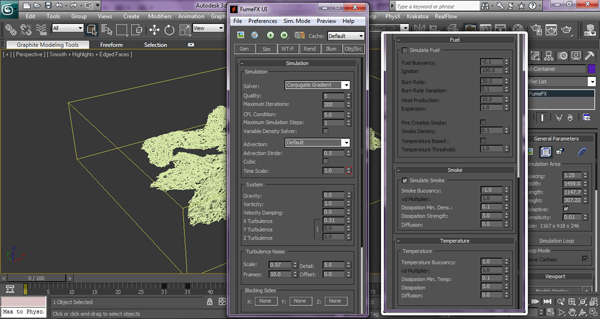
Go to the Sim tab and set the following parameters for each section.
B. Sim Tab:
Simulation:
Quality: 5
Maximum Iterations: 200
CFL Conditions: 5.0
Maximum Simulation Steps: 1
Advection Stride: 0.5
Time Scale: 1.0*
*We are going to animate the Time Scale, because we don’t want anymotion after a certain frame. So what we’ll do is keep the Time Scale set at 1.0 fromframe 0 to 30, and on frame 35, we’ll set the Time Scale to 0.01.
System:
Gravity: 0.0
Vorticity: 1.0
X Turbulence: 0.51
Turbulence Noise:
Scale: 0.57
Frames: 10.0
Detail: 5.0
Blocking Sides:
X : None | Y : None| Z : None
Simulate Fuel:
Turn Off Simulate Fuel.
Note - Don’t Change any parameters for the Smoke orTemperature, keep them Default.
Step 3
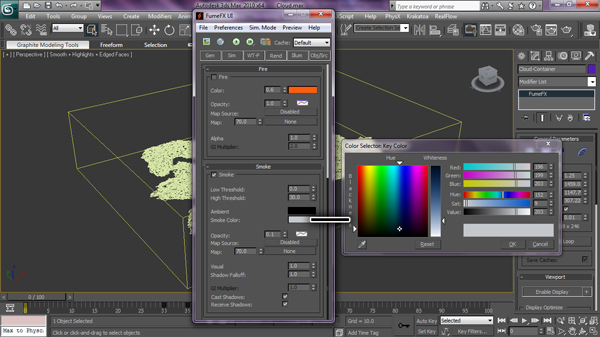
C. Rend Tab:
Rendering Parameters:
We are not changing anything under this tab.
Fire:
We are not changing anything under this tab either.
Smoke:
Ambient: R : 0 | G : 0 | B : 0
Smoke Colour: R : 196 | G : 199 | B : 203
Opacity: 0.1
Cast Shadows: Checked
Receive Shadows: Checked
Note: Keep all other parameter as default.
Step 4
D. Illum Tab:
Before start working on this tab, we need to add some lights. We will use one Omni Light.
Create an Omni Light by going to Create > Lights > Standard Lights > Omni and clicking in the viewport. And position the light at the following coordinates:
X : -34.785 | Y : -703.98 | Z : 909.777
Step 5
Next, go to the Modify panel and adjust the Light's settings:
Turn On Shadows.
Go to the Shadow Parameters rollout andturn On Atmosphere Shadows.
Multiplier: 0.71
Light Color: R: 255 | G:255 | B: 255
Note - Keep everything else at default.
Step 6
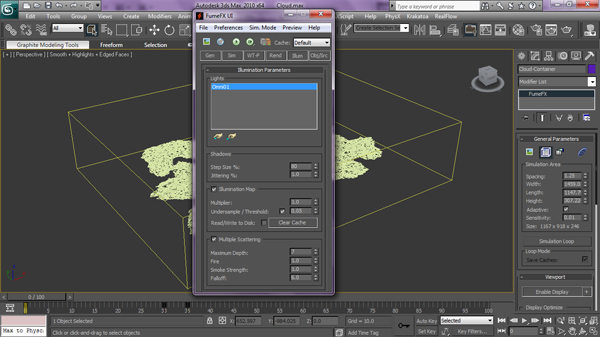
Back in FumeFX, go to the Illum tab and add the Omni light to the Lights list by by picking it, then change the following values:
Turn On Multiple Scattering.
Maximum Depth: 7
Fire: 1.0
SmokeStrength: 1.0
Falloff: 6.0
Step 7
D. Obj/Src Tab:
Note - This is Final Step before you hit the Simulation button.
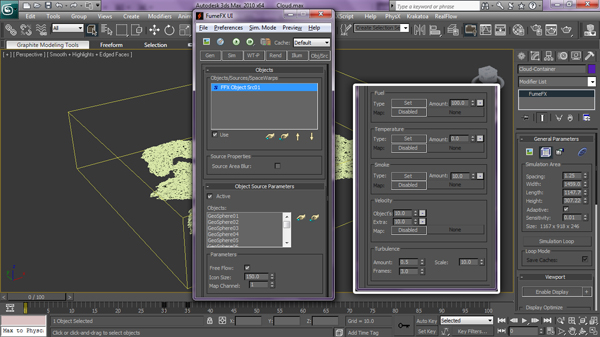
Add the FFXCloud Src to the Objects tab. When you select the FFX CloudSrc, another tab will appear called Simple Source Parameters. Nowadd all the Geospheres to the Objects list.
Next, change theParameters as follows:
Fuel:
Amount: 100.0
Temperature:
Amount: 0.0
Smoke:
Amount: 10.0
Velocity: We change the velocity parameter, because it’ll affect the motion of the smokeas per the Geosphere animation.
Object’s: 10.0
Extra: 10.0
6. Start the Simulation
Step 1
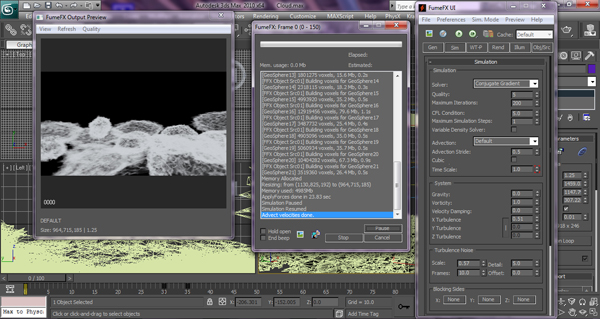
Hit the Simulation Button. It may take around 6 or 7 Hours for this 100 Frame Simulation.
I want to share one important thingwith you. If you want to work with plugins like FumeFX or RealFlow, you'll need a very high-end Machine because ifyou are working on big scenes and you don’t have such a machine. The softwarewill crash every time and you won't be able to deliver the project on time, or deliver it at all.
I’m using a Intel Core i7- 2700K CPU @ 3.50GHz with 16GB Ram, and it still takes 3 to 4 minutes to simulate a single frame of this cloud.
7. Adding the BackgroundImage
Step 1
After the simulation completes, let’screate a background image.
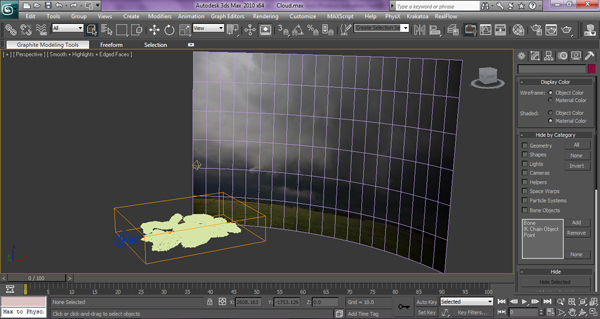
Create a Plane and place it in the background. We'll apply a cloud texture to this plane.
I’ve attached the cloud image I'm using. You can useit, or another image of your choice. I’ve already created the scene file with the Cameraand Plane setup, so just have alook in the project files that accompany this tutorial.:)
8. Rendering
Step 1
After the simulation is complete and the scene is setup. Go to the Render Setup by pressing F10, or by going to Rendering > Render Setup.... Render the animation as a image sequence using a HDresolution of 1280x720.
9. Compositing
Step 1
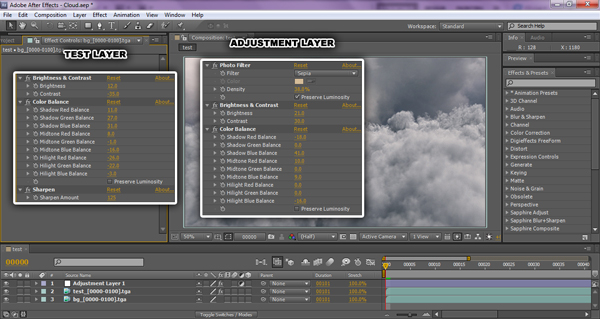
Open After Effects and load the image sequence you rendered from 3D Studio Max. Add your real Cloud image in as the background. And then add your cloud layer (your rendered image sequence) over top.
You can now apply a few simple effects to the cloud layer. For example:
Brightness & Contrast
Color Balance
Sharpen
Step 2
You can also try adding an Adjustment Layer on top and applying these effects to take it further.
Photo Filter
Brightness & Contrast
Color Balance
Conclusion
There are two ways to create such clouds. in 3D Studio max. The first is what I've covered here, and the second is creating small geometry setups and using multiple FumeFX containers and placing them as per your requirements.
I did these Clouds using FumeFX, but soon I'll be showing how to make them using Afterburn with a similar, or maybe even better output, so keep watching and good luck… keep working...
From: http://cgi.tutsplus.com/tutorials/create-realistic-clouds-in-3ds-max-with-fumefx--cms-21151
You must Sign up as a member of Effecthub to view the content.
A PHP Error was encountered
Severity: Notice
Message: Undefined index: HTTP_ACCEPT_LANGUAGE
Filename: helpers/time_helper.php
Line Number: 22


3234 views 2 comments
You must Sign up as a member of Effecthub to join the conversation.